Title Easy Cannoli Shell Recipe A Delicious Twist on a Classic Italian Dessert
You are watching: cannoli shell recipe without wine
Introduction
I Why This Recipe Works
II The Dough
III The Filling
IV Rolling Out the Dough
V The DeepFrying Fat
VI Forming and Frying the Pastry Shells
VII How to Release Cannoli Shells From Their Forms
VIII How to Make Homemade Cannoli
Conclusion
Note The outline provided above is a general structure for the blog post article The actual content and organization may vary based on the writers preferences and the desired length of the article
Depending on where you live, finding good cannoli shells can be a bit of a challenge. But why settle for store-bought when you can easily make your own from scratch? With just a few
simple ingredients and some basic kitchen skills, you can create homemade cannoli shells that are crispy, flaky, and incredibly delicious.
The beauty of making your own cannoli shells is that you have complete control over the size and shape. Whether you prefer small bite-sized shells or large ones to hold an extra scoop of creamy filling, it’s entirely up to you. Plus, by making them at home, you can experiment with different flavors and add a unique twist to this classic Italian dessert.
One underrated variation is incorporating different spices into the shell dough. Traditional recipes usually call for just flour, sugar, salt, butter or shortening, wine (usually Marsala), and sometimes cocoa powder. However, adding cinnamon or nutmeg to the dough brings warmth and depth of flavor that pairs perfectly with the sweet filling. You could even try experimenting with cardamom or ginger for an unexpected twist that will take your cannoli experience to new heights.
Introduction
Cannoli shells are a beloved Italian treat that have been enjoyed for centuries. These sweet and crispy pastry shells are filled with a creamy ricotta filling, creating a delightful
combination of flavors and textures. While traditional cannoli shells can be found in many bakeries, there is something special about making your own homemade version. Not only can you customize the size and shape of the shells to your liking, but the process itself is incredibly satisfying.
Making cannoli shells at home may seem intimidating at first, but with the right recipe and technique, it is actually easier than you might think. The key to achieving that perfect crispiness lies in using the right ingredients and following each step carefully. One of the secrets to achieving a light and airy texture is incorporating both butter and white wine into the dough mixture. This unique twist on a classic recipe adds an extra layer of flavor while helping create those delicate layers that make each bite so satisfying.
Making cannoli shells at home may seem intimidating at first, but with the right recipe and technique, it is actually easier than you might think. The key to achieving that perfect crispness and delicate flakiness lies in the dough. Contrary to what some may believe, making cannoli dough from scratch doesn’t require any fancy equipment or special skills. All you need is a mixing bowl, a rolling pin, and an enthusiastic attitude.
One of the great benefits of making your own cannoli shells is that you can customize them to suit your taste preferences. For a traditional flavor, adding orange zest or vanilla extract to the dough will give it that authentic Italian touch. However, if you’re feeling adventurous, why not experiment with different combinations? A dash of cinnamon or nutmeg can add warmth and depth to your shells, while infusing the dough with espresso or cocoa powder can create an indulgent twist on this classic dessert.
Another advantage of making cannoli shells at home is that it allows for endless creativity when shaping them. While traditional cannolis are tubular in shape, there’s no reason not to have fun with different forms. Try forming them into mini bowls and fill them with whipped cream and fresh berries for a unique summer treat. Or consider folding the edges over filling like dumplings for a playful presentation at dinner parties. There’s just something magical about biting into a freshly-made cannoli shell. The crunch sends shivers down your spine as you taste every layer of pastry perfection. But what truly sets homemade cannoli shells apart from store-bought ones is the pride that comes with creating something so delicious from scratch in your very own kitchen. Plus, once you’ve mastered this versatile recipe, you’ll be able to experiment with different shapes, sizes, and fillings to suit your personal preferences or wow your guests at any event.
(Image source: https://unsplash.
Briefly introduce the concept of cannoli and its popularity as a traditional Italian dessert
The cannoli, a beloved traditional Italian dessert, has gained immense popularity worldwide. This delectable sweet treat hails from Sicily and is characterized by its crispy shell filled
with a creamy ricotta filling. The combination of textures and contrasting flavors makes cannoli a truly indulgent experience.
One reason for the enduring popularity of cannoli is its versatility. While the classic cannoli features a simple ricotta filling, modern variations have expanded the possibilities. From chocolate to pistachio or even Nutella-filled options, the sheer variety of fillings can cater to every taste preference. Whether enjoyed as an after-dinner treat or at festive celebrations like weddings and holidays, cannoli continues to captivate food enthusiasts around the globe.
Furthermore, cannoli’s appeal lies not only in its taste but also in its cultural significance. It represents the rich culinary heritage of Italy and is often associated with celebrations and family gatherings. Italians take pride in their traditional recipes passed down through generations and sharing this dessert evokes a sense of nostalgia for many people who grew up enjoying these delightful treats at family gatherings.Therefore, it’s no surprise that wherever you go, from local bakeries to high-end restaurants, you’ll find variation after variation beautifully displayed behind glass cases – symbolic testaments to the universal love for this classic Italian dessert.
Highlight the versatility of cannoli shells and the various ways they can be made
Cannoli shells are a versatile base that can be filled with a wide range of flavors and textures, making them perfect for experimentation in the kitchen. While traditional cannoli shells
are made using flour, sugar, eggs, and butter, there are also gluten-free and vegan options available. For a healthier twist on the classic recipe, try using almond or coconut flour instead. These alternative flours not only add a unique flavor but also lend a lighter texture to the shell.
Another way to get creative with your cannoli shells is by adding various spices and extracts into the dough mixture. For instance, you can infuse the dough with hints of cinnamon or cardamom to create a warm and aromatic twist on this Italian dessert. Additionally, incorporating extracts like vanilla or orange blossom water can add depth and complexity to the flavor profile of your cannoli shells – taking them from simple pastries to gourmet delights.
If you’re feeling more adventurous, consider experimenting with different shapes and sizes when making your cannoli shells. Instead of just sticking to the traditional tubular shape, why not make mini cannolis by forming smaller circles of dough before frying? Alternatively, you could create new shapes altogether – think heart-shaped or star-shaped cannolis for special occasions or themed parties.
The versatility of cannoli shells truly knows no bounds. Whether you choose to go gluten-free or vegan, play around with flavors like spices and extracts, or explore unconventional shapes – each variation will offer its own unique twist on this beloved dessert.
I Why This Recipe Works
Explain the importance of a wellmade cannoli shell and how it contributes to the overall taste and texture of the dessert
The cannoli shell is the foundation of this iconic Italian dessert, playing an essential role in its taste and texture. A well-made cannoli shell adds a delightful crunch that contrasts
perfectly with the creamy filling, creating a harmonious balance of flavors and textures. The secret to achieving the perfect shell lies in its delicate flakiness that effortlessly shatters upon every bite, revealing the luscious filling hidden within.
One key element of a well-made cannoli shell is its ability to remain light and hollow despite being fried to perfection. This ensures that the focus remains on the cream or ricotta filling rather than a heavy, doughy exterior. The shell’s texture should be crisp and airy, allowing it to melt in your mouth as you savor each sweet morsel.
Moreover, a flawlessly prepared cannoli shell enhances the overall presentation of this classic Italian treat. Its golden-brown hue brings forth a sense of indulgence and elegance when served on a dessert platter. And let’s not forget about its intriguing shape – cylindrical yet delicately curved – making it alluringly inviting and irresistible to both eyes and taste buds.
In summary, devoting attention to crafting a well-made cannoli shell is crucial for elevating the overall experience of enjoying this beloved dessert. From its pleasing crunchiness to its ability to enhance flavors and showcase rich fillings, it truly sets the stage for an unforgettable gustatory journey.
Discuss the benefits of using a homemade shell such as customization and control over ingredients
Using a homemade shell for your cannoli not only allows for customization, but also gives you complete control over the quality and freshness of the ingredients. When making your
own cannoli shells, you have the freedom to add unique flavors and textures to suit your personal preferences. For instance, you can infuse the dough with citrus zest or incorporate spices like cinnamon or nutmeg for a little extra kick. By experimenting with different ingredients, you can create an array of delightful variations that will keep everyone coming back for more.
With store-bought shells, there’s often no way to know exactly what goes into them. Homemade shells remove this uncertainty as you have full oversight of every ingredient used. This means no unwanted preservatives or artificial additives are included in your dessert. Plus, by using high-quality ingredients such as organic flour and fresh eggs, you can enhance both the taste and nutritional value of your cannoli shells. Taking control over these elements provides a sense of satisfaction that comes from creating something deliciously wholesome from scratch.
In addition to customization and ingredient control, another great benefit of homemade cannoli shells is their versatility. These crispy pastry tubes aren’t just reserved for traditional Italian fillings— they can be filled with an endless variety of sweet or savory concoctions based on your creativity! From classic ricotta-based creams to rich chocolate mousse fillings or even elegant fruit-infused cremes, the possibilities are endless when it comes to homemade cannoli shells.
II The Dough
When it comes to making cannoli shells from scratch, the dough is the key ingredient that sets these delicate treats apart. While many recipes call for a simple mixture of flour, sugar,
butter, and eggs, there are endless possibilities for adding a unique twist to your dough. Consider incorporating orange zest or almond extract for an added burst of flavor. Alternatively, you can experiment with different types of flours, such as using a combination of all-purpose and cake flour to achieve the perfect balance between crunchy and tender.
The dough-making process itself is also an art form worth mastering. The key here is patience—taking the time to properly knead the dough ensures a smooth texture and even distribution of ingredients. Additionally, allowing the dough to rest in the refrigerator before rolling it out not only makes it easier to handle but also helps develop its flavors further. Don’t be afraid to get your hands dirty – working with fresh dough can be therapeutic and rewarding in itself.
As you embark on your homemade cannoli shell journey, remember that every touch and tweak you make to your dough will result in a truly personalized creation. So unleash your creativity, embrace experimentation, and let your taste buds be your guide as you create cannoli shells that go beyond tradition!
Provide a stepbystep guide on how to make the cannoli dough emphasizing simplicity and ease of preparation
To make the perfect cannoli dough, you’ll need just a handful of ingredients and a couple of steps. Start by whisking together 1 ½ cups of all-purpose flour, 2 tablespoons of
granulated sugar, and a pinch of salt in a mixing bowl. Then, add 2 tablespoons of chilled butter (cut into small pieces) to the dry ingredients and use your fingers or a pastry cutter to blend everything until it resembles coarse crumbs.
Next, create a well in the center of the mixture and pour in ¼ cup of Marsala wine and 1 egg yolk. Using your fingers or a fork, gradually incorporate the wet ingredients into the dry ones until you have a shaggy dough. Transfer the dough onto a floured surface and knead it for about five minutes until it becomes smooth and elastic.
Once your dough is ready, wrap it tightly in plastic wrap and let it rest at room temperature for about an hour before rolling out circles that are roughly six inches in diameter. Finally, carefully wrap each circle around individual metal cannoli tubes (or even thick wooden dowels) before frying them until golden brown.
With these easy-to-follow steps, making homemade cannoli shells has never been simpler. So go ahead and give this versatile twist on an Italian classic dessert a try—you won’t be disappointed!
Mention the key ingredients required for the dough and their purpose in achieving the desired texture
When it comes to making homemade cannoli shells, the key ingredients for the dough are simple yet essential in achieving that desired texture. Flour is the main ingredient, providing
structure and stability to the dough. All-purpose flour works well, but some bakers prefer using cake flour for a lighter and more delicate shell. Adding sugar not only sweetens the dough but also helps with browning during frying.
Another key ingredient is fat, typically butter or shortening. The fat adds richness to the cannoli shell and contributes to its flaky texture. Some recipes even call for lard, which adds a distinct flavor and crumbly consistency. Lastly, liquids such as water or milk are added to bind all the ingredients together. These liquids hydrate the flour and help create a cohesive dough that can be easily rolled out without cracking or breaking.
By understanding these key ingredients and their purpose in your cannoli shell recipe, you’ll have a firm grasp on how they contribute to achieving that perfect texture everyone loves. Whether you choose cake flour for a lighter bite or opt for butter over shortening for a richer flavor, experimenting with different variations can result in unique twists on this classic Italian dessert. So gather your ingredients and get ready to impress your family and friends with homemade cannoli shells that are sure to tantalize their taste buds!
III The Filling
III The Filling
Now that you have mastered the art of making delicious homemade cannoli shells, it’s time to move on to the star of the show – the filling! Traditionally, cannoli fillings are made with a combination of ricotta cheese, sugar, and vanilla extract. While this classic filling is undeniably delightful, there are countless variations that can add an exciting twist to your cannoli experience.
One popular alternative is using mascarpone cheese instead of ricotta. Mascarpone has a smoother and creamier texture compared to ricotta, resulting in a luscious filling that melts in your mouth. To enhance its flavor, try adding some grated orange or lemon zest. The refreshing citrusy undertones will balance out the richness of the mascarpone perfectly.
If you’re feeling adventurous, consider experimenting with different flavors and textures by incorporating ingredients like chocolate chips, chopped nuts, or dried fruit into your filling mixture. By doing so, you can create unique combinations that cater to your personal taste preferences and elevate your homemade cannoli to a whole new level.
Remember that presentation also plays a crucial role in enhancing the overall appeal of your filled cannoli. To achieve an exquisite touch, consider piping the filling directly into each shell using a decorative tip or swirling it onto one end before dipping it in crushed pistachios or mini chocolate chips for added texture.
Discuss the significance of a superthick and stable custard base for the cannoli filling
A superthick and stable custard base is the holy grail of cannoli filling. It sets the stage for an unforgettable dessert experience by bringing together all the flavors and textures in
perfect harmony. The custard, made from a rich combination of milk, sugar, and eggs, acts as the creamy backbone that holds everything else together.
First and foremost, a thick custard base ensures that your cannoli filling won’t turn into a soupy mess. Nobody wants their delicate pastry shells to be ruined by runny cream! By cooking the custard over low heat until it reaches just the right consistency, you create a lusciously firm filling that can hold its shape beautifully inside each shell.
But stability isn’t just about appearance; it also affects taste and mouthfeel. A properly thickened custard has a luxurious velvety texture that adds another layer of indulgence to each bite. As you sink your teeth into the crisp yet tender shell, you’re met with this impeccably smooth creaminess that delights your palate in ways only a well-executed dessert can.
So next time you embark on making homemade cannoli filling, don’t underestimate the significance of achieving an ultra-thick and stable custard base. Its impact on flavor satisfaction cannot be understated – it elevates an already beloved Italian treat to new heights of decadence. With every bite, savor the remarkable feat accomplished by this humble but crucial component that transforms mere pastry into pure bliss.
Share a simple yet delicious cannoli filling recipe that complements the homemade shells
There’s no denying the fact that a good cannoli is all about the filling. It’s what takes these crispy, golden shells to another level of indulgence. While traditional ricotta-based fillings
are always a hit, why not try something different? A simple, yet delicious alternative is a mascarpone and chocolate chip filling.
To make this heavenly concoction, beat together 1 cup of mascarpone cheese with 1/2 cup powdered sugar until smooth and creamy. Then, fold in 1/2 cup of mini chocolate chips for an extra burst of decadence. The richness of the mascarpone perfectly complements the crunchy shell while the chocolate chips add texture and bursts of sweetness.
Another delightful option is a Nutella and whipped cream filling. Whip up 1 cup heavy whipping cream until soft peaks form, then gently fold in 3/4 cup of Nutella to create an irresistible combination. The creamy texture and intense flavors of the Nutella paired with light-as-air whipped cream make this filling utterly dreamy.
These different fillings offer exciting twists on the classic cannoli while still maintaining that irresistible Italian charm we’ve all come to love. Whether you’re a fan of traditional or innovative flavors, these recipes are sure to elevate your homemade cannolis to new heights!
IV Rolling Out the Dough
When it comes to making the perfect cannoli shells, the rolling out of the dough is a crucial step that can make or break your homemade treat. While some recipes call for store-
bought dough, there’s something special about taking the time to create your own from scratch. Not only does it allow you to control the thickness and texture of the shell, but it also imparts a unique flavor that can’t be replicated with store-bought options.
Rolling out cannoli dough might seem like a daunting task, but with a little practice and patience, anyone can master this technique. It’s important to start with well-chilled dough to ensure it doesn’t stick to your rolling pin or work surface. Sprinkle flour on both sides of the dough and gently begin rolling from the center outward in short strokes, rotating frequently to maintain an even thickness. Aim for a thinness that allows you to see through the dough when held up against light – this will result in crisp and delicate shells once fried.
An often overlooked aspect of rolling out cannoli dough is dusting off any excess flour before frying. This step may seem insignificant, but it actually plays a vital role in achieving perfectly golden brown shells. Excess flour tends to burn quickly in hot oil and can give an undesirable taste and appearance to your finished product. To avoid this, lightly tap each rolled-out piece of dough against your hands or gently brush off any visible traces before carefully placing them into hot oil for frying.
Provide tips and techniques for rolling out the cannoli dough to achieve the perfect thickness and shape
When it comes to making homemade cannoli shells, achieving the perfect thickness and shape of the dough is key. The goal is to create a delicate shell that is crispy on the outside
and tender on the inside. One way to ensure this is by rolling out the dough evenly and consistently.
To start, lightly flour your work surface and divide your dough into smaller portions for easier handling. Take one portion of dough at a time and gently flatten it with a rolling pin. Begin rolling from the center outward, applying even pressure as you go. Rotate the dough periodically to maintain an even thickness.
As you roll out the dough, keep in mind that different recipes may call for varying thicknesses. Generally, aim for about 1/8 inch thick unless otherwise specified. If your dough starts to stick or become too elastic, lightly dust both sides with flour to prevent sticking and make it easier to manage.
Another tip is using parchment paper or silicone baking mats while rolling out your cannoli dough. This not only prevents sticking but also makes it easier to transfer the rolled-out shells onto a baking tray without any deformation or tearing.
Remember, practice makes perfect! Don’t be discouraged if your initial attempts aren’t exactly what you envisioned. Experiment with different techniques until you find what works best for you.
Mention the importance of using a floured surface and a rolling pin to prevent sticking
When it comes to making homemade cannoli shells, using a floured surface and a rolling pin is absolutely essential. Not only does the flour prevent the dough from sticking, but it also
adds a delightful crispness to the finished product. Imagine trying to roll out your dough on a plain countertop – without any flour – only to have it stick and tear apart. It would be quite frustrating, not to mention messy. By dusting your work surface with flour and lightly coating your rolling pin, you create a barrier that prevents the dough from adhering too strongly.
Another reason why using a floured surface and rolling pin is important is that it allows for better control over the thickness of the cannoli shell. The ideal thickness for these delicate pastry tubes is about 1/8 inch (3mm). With a floured surface, you can easily monitor and adjust the thinness level as you roll out your dough. This precision ensures that you achieve perfectly crispy shells that will hold up well when filled with cream or other sweet fillings.
Finally, using both flour and a rolling pin provides an opportunity for creativity in shaping your cannoli shells. Rather than simply cutting out circles of dough, you can experiment with different shapes and sizes by gently molding the dough with your hands or wrapping it around various objects like empty soda cans or wooden dowels. The key is having that non-stick surface provided by flour so that you can mold and shape your creations without any setbacks. One important aspect of making cannoli shells that often gets overlooked is using a floured surface and a rolling pin to prevent sticking. This simple step can have a significant impact on the final outcome of your homemade cannoli shells.
When you’re working with dough, especially one as delicate as the cannoli shell dough, it’s crucial to ensure that it doesn’t stick to your countertop or rolling pin. By lightly flouring your surface and dusting your rolling pin with flour, you create a barrier between the dough and the work surface. This helps prevent sticking and makes it easier to roll out the dough into thin, even circles.
Not only does using a floured surface and rolling pin prevent sticking, but it also allows for better control over the thickness of the shell. As you roll out the dough on a floured surface, you can easily adjust the pressure applied by your rolling pin to achieve the desired thickness. This ensures that each shell is consistent in texture, resulting in perfectly crisp and delicious cannoli treats every time. So don’t underestimate this seemingly small step – it’s an essential part of creating homemade cannoli shells that are both visually appealing and enjoyable to eat!
V The DeepFrying Fat
Explain the traditional method of deepfrying cannoli shells and its impact on the final taste and texture
Deep-frying is the traditional method of cooking cannoli shells, and it plays a significant role in creating the mouthwatering taste and irresistible texture we associate with this classic
Italian dessert. When you deep-fry a cannoli shell, something magical happens within its delicate layers of pastry dough. The hot oil quickly transforms the raw dough into a golden-brown, crispy exterior that shatters enticingly with each bite.
The impact of deep-frying on the final taste cannot be overstated. The high temperature achieved during frying gives the cannoli shell a beautiful caramelization that adds depth and complexity to its flavor profile. As the oil penetrates into every nook and cranny of the dough, it imparts a subtle richness without overpowering or making it greasy. This combination of perfectly fried exterior and tender interior creates an indulgent contrast that elevates your homemade cannolis to another level.
Additionally, deep-frying contributes greatly to achieving that signature crispiness we all crave when biting into a cannoli. By enveloping each portion of dough in hot oil, air bubbles are formed within the layers, leading to desirable pockets of air trapped throughout the shell’s structure. These empty spaces not only lighten up its overall texture but also maintain structural integrity by preventing excessive absorption of moisture from any fillings added later on.
Offer an alternative method for those who prefer not to deep fry such as baking the shells
For those who prefer not to deep fry their cannoli shells, baking them is a great alternative method that still produces delicious results. Baking the shells offers a healthier option while
also simplifying the cooking process. Simply brush olive oil or melted butter on both sides of pre-made cannoli dough and then gently mold it into a cylindrical shape using metal cannoli tubes. Place the tubes onto a baking sheet lined with parchment paper and bake at 350 degrees Fahrenheit for about 15 minutes or until golden brown.
Baking the shells ensures they come out crisp and golden, with just enough lightness to perfectly complement any filling you choose to use. Plus, it takes away the mess and potential dangers associated with deep frying. This method can be especially appealing for those who are health-conscious but still want to enjoy this well-loved dessert without sacrificing taste or texture. So next time you’re in the mood for homemade cannoli, try this alternative approach that allows you to have your cannoli shell and eat it too – all without worrying about hot oil splatters or excess grease!
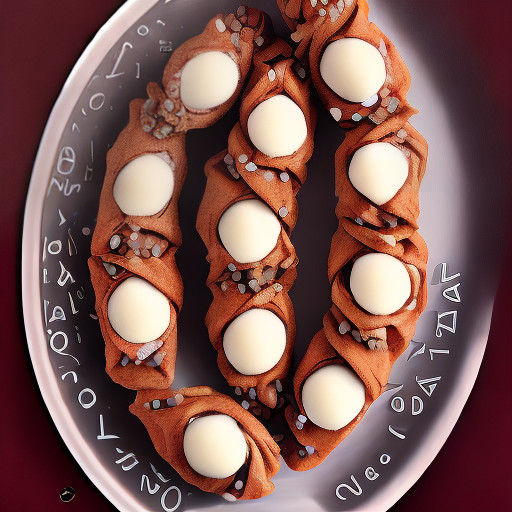
VI Forming and Frying the Pastry Shells
Once you have made the dough for your cannoli shells, it’s time for the fun part – shaping and frying them! To achieve the traditional tubular shape of cannoli shells, you will need
metal tubes or wooden dowel rods. Gently wrap the dough around these cylindrical forms and seal the edges with a little beaten egg white. This step requires some patience and finesse, as you want to create a thin layer of pastry that will become beautifully crisp when fried. Remember to leave enough space on each end of the tube so that it can be easily removed after frying.
Next comes the all-important frying process. It’s essential to maintain a consistent temperature to ensure perfectly golden cannoli shells. Heat vegetable oil in a deep pot or fryer to about 350°F (175°C). Carefully lower each wrapped tube into the hot oil and allow them to cook until they turn a lovely shade of brown, approximately 3-4 minutes. Using tongs or claws specifically designed for cooking, carefully remove each shell from the oil and let them cool on paper towels. The result? Delicate pastry shells with an enticing aroma that are just waiting to be filled with creamy goodness!
The beauty of making your own cannoli shells is that you can customize their size and shape according to your liking. If you prefer smaller bites, consider using slender pieces of dowel rod instead of larger metal tubes.
Describe the process of forming the cannoli shells using cannoli forms or other substitutes
When it comes to making homemade cannoli shells, using cannoli forms or other substitutes is a crucial step in achieving the perfect shape and crispiness. The traditional method
calls for metal cannoli tubes, which are rolled into thinly cut circles of dough before being fried. However, if you don’t have those on hand, there are alternative options available that can produce equally delicious results.
One substitute for cannoli forms is aluminum foil. Simply wrap a piece of foil tightly around a wooden dowel or metal rod to create the desired tube shape. Another option is to use sugar cones or small cream horn molds found in baking supply stores. These provide the necessary structure and shape for the shells as they bake in the oven.
Regardless of the substitute you choose, it’s important to take care when filling and shaping the dough around these forms. Start by rolling out your dough until paper-thin and cutting them into circles with a cookie cutter or glass rim. Gently wrap each circle around your chosen form, ensuring that there are no gaps in between. For an added touch of flavor, lightly brush each shell with beaten egg white before baking or frying.
Using cannoli forms or their substitutes may seem daunting at first, but with practice they become simple tools for achieving professional-looking cannoli shells right at home. Experimenting with different sizes and shapes can add variety to your display and make dessert time more exciting – just remember to remove the form once cooled!
Provide detailed instructions on how to fry the shells until golden and crispy
One of the secrets to achieving a perfectly crispy cannoli shell lies in mastering the art of frying. To start, heat a generous amount of vegetable oil in a deep, heavy-bottomed pot or
skillet over medium-high heat. As the oil reaches the optimal temperature (around 350°F), carefully place one shell into the pot using tongs or a slotted spoon. Be sure not to overcrowd the pot, as this will result in uneven cooking and potentially lead to soggy shells.
Allow the shell to fry for approximately 1-2 minutes on each side, or until it turns a beautiful golden brown color. Keep an eye on them throughout the frying process, using your utensils to gently flip and move them around as needed. Once they are evenly fried and reach desired crispness, use your tools to carefully remove them from the hot oil and transfer them onto a tray lined with paper towels. The paper towels will help absorb any excess oil while also allowing air circulation for continued crisping.
Voila! You’re now left with irresistibly crunchy cannoli shells that are just waiting to be filled with luscious cream and other delectable fillings of your choice. With these detailed instructions, you too can master the art of frying cannoli shells like a seasoned pastry chef. So go ahead – embark on this culinary adventure and impress family and friends with your very own homemade cannolis!
VII How to Release Cannoli Shells From Their Forms
One of the most crucial steps in making homemade cannoli shells is removing them from their forms. While it may seem like a simple task, releasing these delicate and crispy shells
can sometimes be tricky. To ensure success, it’s important to take your time and follow these helpful tips.
Making homemade cannoli shells can sometimes be tricky. The delicate pastry requires just the right combination of ingredients and technique to achieve that perfect, crispy shell. To ensure success, it’s important to take your time and follow these helpful tips.
First, make sure your dough is well-chilled before rolling it out. This will prevent it from sticking to the surface and make it easier to handle. It’s also crucial to use a high-quality flour and sift it before adding it to the dough mixture. This will help create a lighter texture in the final product.
Next, when shaping the cannoli shells around the metal tubes or molds, be gentle but firm with your pressure. Too much force can cause them to break or lose their shape during frying. Additionally, once you’ve removed them from the oil, drain them upside down on a wire rack or paper towels to get rid of any excess grease.
Lastly, don’t forget about filling options! While traditional cannoli are often filled with sweetened ricotta cheese mixed with chocolate chips or candied fruit, there are endless possibilities for creativity. Experiment with flavors like pistachio cream, Nutella mousse, or even lemon curd for a refreshing twist on this classic Italian dessert.
By following these tips and allowing yourself some patience and practice, you’ll soon become an expert on making homemade cannoli shells that rival those found in fancy bakeries. Enjoy impressing your family and friends with this versatile twist on a beloved treat! First, make sure that the shells have cooled completely before attempting to remove them from their forms. This will prevent any breakage or crumbling as you gently extract them. Next, use a small kitchen utensil like a butter knife or the back of a spoon to carefully loosen the edges of the shell from the form. Slowly work your way around, applying even pressure and making sure not to squeeze too hard.
If you’re still having trouble releasing the cannoli shells, try spraying a light coating of cooking spray on the inside of each form before shaping the dough around it. This will act as a lubricant and aid in effortless removal once they are fully cooked and cooled. Additionally, placing the forms in a freezer for about 10 minutes can help solidify the shell slightly and make extraction easier.
By following these simple tips and tricks, you’ll be able to effortlessly release your homemade cannoli shells from their forms without any frustration or damage to your perfectly baked treats. So go ahead and give this versatile twist on a classic Italian dessert a try – your taste buds will thank you!
Share tips and tricks for easily removing the cannoli shells from their forms without damaging their shape
VIII How to Make Homemade Cannoli
Making homemade cannoli shells may seem like a daunting task, but with the right recipe and technique, it can be a fun and rewarding experience. One key tip is to ensure that your
dough is chilled before rolling it out. This helps create a crispy and flaky texture once fried. Another important aspect of making cannoli shells is to use the correct ratio of ingredients. Too much flour can lead to dense shells, while too little will result in thin and fragile ones.
A unique twist on traditional cannoli shells involves adding a hint of cinnamon or orange zest to the dough. These simple additions can bring an extra layer of flavor and make your homemade treats truly stand out. Additionally, experimenting with different shapes for your shells can add an artistic touch to your desserts. Try rolling the dough into small tubes or shaping them into cups using molds – not only will they look stunning, but they’ll also provide different textures when bitten into.
In conclusion, making homemade cannoli allows you to personalize this classic Italian dessert according to your taste preferences. By following these tips and tricks, you can elevate your cannoli game from ordinary to extraordinary and impress friends and family at gatherings or parties. So go ahead and embark on this culinary adventure – after all, nothing beats the satisfaction of biting into a freshly made cannoli shell!
Summarize the entire process of making cannoli from preparing the dough to filling and serving the shells
Making cannoli from scratch is a labor of love that begins with preparing the dough. The process starts by mixing flour, sugar, salt, and butter, then gradually adding in a combination
of egg yolks and white wine vinegar. As you knead the dough, it should become smooth and pliable. Once ready, let it rest for at least an hour in the refrigerator to allow the flavors to meld together.
When the dough has chilled sufficiently, it’s time to shape and fry the shells. Roll out small portions of dough into thin circles and wrap them around metal cannoli tubes or wooden dowels. Seal the edges firmly with water or beaten egg white to prevent any leakage during frying. With a pot filled with hot oil, carefully immerse each shell until they turn golden brown and crisp – this will take only a few minutes! To ensure even frying, gently rotate each tube while submerged.
Now comes the fun part – filling your homemade cannoli shells with delicious cream! Start by whipping ricotta cheese together with powdered sugar until smooth. Then fold in a touch of vanilla extract or candied fruit for added flavor depth. When ready to serve, generously fill each shell from both ends using either a piping bag or spoon. Don’t forget to sprinkle powdered sugar on top for that final touch before indulging in these delightful treats!
Encourage readers to try the recipe and experiment with different fillings and toppings
As you embark on the journey of making your own homemade cannoli shells, let your creativity run wild when it comes to the fillings and toppings. The beauty of this recipe lies in its
versatility – by experimenting with different flavors, you can create a truly unique and personalized dessert experience.
When it comes to fillings, why not try a classic ricotta filling flavored with vanilla extract and a touch of orange zest? Or perhaps go for a more indulgent twist by adding chocolate chips or crushed pistachios to the mixture. Don’t limit yourself to sweet options either – savory fillings like goat cheese and herbs can be equally delicious.
And don’t forget about the toppings! Dusting your cannoli shells with powdered sugar is always a crowd-pleaser, but don’t stop there. Consider dipping one end of the shell in melted chocolate and rolling it in chopped nuts for an extra layer of texture and flavor. Alternatively, drizzle some caramel or berry sauce over the top for an elegant finishing touch.
So go ahead, take this basic cannoli shell recipe as your starting point and let your imagination guide you towards endless possibilities. Inspire others by sharing your own favorite fillings and toppings on social media or hosting a tasting party where guests can indulge in various creations. Don’t be afraid to get creative – after all, that’s what homemade desserts are all about! Once you’ve mastered the art of making homemade cannoli shells, why not take your culinary skills to the next level by experimenting with different fillings and toppings? While traditional cannoli are typically filled with a sweet ricotta cheese mixture, there’s no reason why you can’t get creative and try something new. Consider filling your shells with a velvety chocolate ganache or a tangy lemon curd for a refreshing twist. And don’t forget about toppings! Sprinkle crushed pistachios or mini chocolate chips on top of your filled cannoli to add an extra layer of flavor and texture.
Trying different fillings and toppings is an excellent way to personalize this classic Italian dessert and make it truly your own. The possibilities are endless – perhaps you’ll discover a unique combination that becomes your signature cannoli recipe. Why not experiment with adding fresh berries or shredded coconut to the filling for a fruity or tropical flair? Or how about drizzling some caramel sauce over the top for an indulgent touch? Don’t be afraid to think outside the box and have fun with it!
Trying different fillings and toppings is an excellent way to personalize this classic Italian dessert and make it truly your own. While the traditional cannoli filling consists of a delicious combination of ricotta cheese, sugar, and vanilla extract, don’t be afraid to get creative and experiment with flavors. Whether you add a touch of citrus zest, a sprinkle of cinnamon, or a drizzle of chocolate sauce, these extra ingredients can take your cannoli to the next level.
When it comes to toppings, there are endless options that can elevate your cannoli experience. You could opt for a classic dusting of powdered sugar or crushed pistachios for a crunchy texture. For those with a sweet tooth, try adding chopped fruits like strawberries or blueberries for a refreshing burst of flavor. If you’re feeling adventurous, consider adding savory toppings such as shredded coconut or even bacon bits – yes, bacon pairs surprisingly well with the creaminess of cannoli filling!
The beauty of making homemade cannoli shells is that they provide the perfect blank canvas for your creativity in terms of fillings and toppings. Don’t be afraid to break away from tradition and let your taste buds guide you towards new combinations that suit your preferences. After all, there’s no right or wrong way to enjoy these delectable treats! So go ahead and let your imagination run wild as you transform this classic Italian dessert into something uniquely yours. By encouraging readers to try different fillings and toppings, we’re inviting them to unleash their creativity in the kitchen. Don’t be hesitant – go ahead and experiment! After all, cooking is as much about exploration as it is about following recipes. So grab those homemade cannoli shells, play around with different flavors, textures, and presentations until you find what satisfies your taste buds.
Conclusion
Recap the key points discussed in the article emphasizing the simplicity and versatility of the homemade cannoli shell recipe
Encourage readers to explore other Italian ricotta dessert recipes and provide links to related articles
If you have fallen in love with the rich and creamy filling of cannoli, why stop there? The versatile Italian ricotta cheese can be used to create a variety of other mouthwatering desserts that are worth exploring. From delicate ricotta cheesecakes to fluffy pancakes, the possibilities are endless.
For those looking for a lighter option, try making a refreshing lemon ricotta cake. The zesty citrus flavor complements the smoothness of the ricotta perfectly, resulting in a dessert that is both tangy and sweet. If you prefer something more decadent, indulge in a warm chocolate lava cake made with ricotta instead of traditional cream cheese. The addition of ricotta gives these cakes an extra richness and creates an irresistibly gooey center.
To further expand your repertoire of Italian ricotta desserts, check out our recommended articles below:
– Delicious Ricotta Tart Recipes: A Sweet Slice of Italy: Discover how to make beautiful tarts filled with velvety ricotta cream and topped with vibrant summer fruits.
– Classic Sicilian Cassata: A Festive Ricotta Cake: Learn about this colorful and festive cake traditionally served at special occasions in Sicily. It features layers of sponge cake soaked in liqueur, candied fruits, and creamy sweetened ricotta.
Let your culinary curiosity guide you as you venture into the world of Italian sweets beyond cannoli shells.
As tempting as it may be to focus solely on cannoli shells when exploring Italian sweets, there is a wide array of delicious treats waiting to be discovered. From traditional regional specialties to modern twists on classic recipes, Italy’s dessert culture is rich and diverse. So why limit yourself? Let your culinary curiosity guide you as you venture into the world of Italian sweets beyond cannoli shells.
One delightful option to explore is the world of Italian gelato. Made with a higher butterfat content than ice cream, gelato boasts a creamier texture and more intense flavors. From velvety chocolate and creamy vanilla to fruity concoctions like strawberry or lemon, there are endless possibilities for indulging your sweet tooth in this frozen delight.
For a taste of something truly decadent, consider trying tiramisu. This coffee-infused dessert layers espresso-soaked ladyfingers with rich mascarpone cheese and dusts them with cocoa powder for an irresistible treat that balances sweetness with a hint of bitterness. Don’t forget to savor every bite slowly – after all, tiramisu translates to pick me up, and it certainly lives up to its name when enjoyed mindfully.
So step out of your comfort zone and explore the sweet side of Italian cuisine. Whether you choose gelato, tiramisu, or another delectable treat altogether, don’t shy away from letting your culinary curiosity lead the way into uncharted dessert territory – who knows what delightful surprises await! Invite readers to leave comments and share their experiences with the recipe